# Open Network Lab
_An evening event introducing beginners to IoT and TTN in a hands-on way._
:calendar: 17:00 - 20:00+ on December 4, 2023
:globe_with_meridians: **Glue**, [Schwarztorstr. 31, Bern](https://s.geo.admin.ch/a300673233), 2nd floor
:clipboard: **[Anmeldung auf DE](https://www.glue.ch/de/2023/11/03/mint-special-open-network-lab/) / [Registration in EN](https://www.glue.ch/en/2023/11/07/open-network-lab-mint-special-event/)**
:bulb: Presentation: [Slides als ODT / PDF](https://web.tresorit.com/l/DNIcy#ciVVOT85MyZNtONqcKPZHw)
## You are invited!
At the beginning of December, we are kindly invited by [Glue Software Engineering AG](https://www.glue.ch/), to plug in for an evening of tinkering and sharing at their offices in central Bern.
Beginners welcome! The goal of the evening is to implement various small Internet of Things (IoT) projects and connect them using LoRaWAN on TTN (we will explain the buzzwords further down). Of course, pizza and drinks will not be neglected to sustain the human operators. We will start with an input session, get our hardware and form sub-teams.
An IoT-ready device will be provided **for each participant**, along with sensors, wires, schematics. Experienced people and a few trusted books will be on hand to help you get started. You are of course also welcome to **bring your own devices**, sensors and books to hack, show and share. We plan to reach running state by 8 PM. In the aftermath, we are invited by Glue to enjoy pizza and seasonal drinks together with other Lab attendees.
**Requirements**: attendees should bring their own notebook (Windows, Mac, Linux) with a working USB socket of **type A** (i.e. if you only have USB-C ports, please bring an adapter). This is needed to connect and power up your device. Please try to install if possible the basic [software](#Software) in advance, as we detail below.
We are building this workshop on experiences like our event chez [ti&m](https://www.thethingsnetwork.org/community/Bern/post/hacknight-iot-ttn) earlier this year (see [@loleg's thread](https://fosstodon.org/@loleg/109797409805990498)). TTN hacknights are supported by [The Things Network Bern](https://www.thethingsnetwork.org/community/Bern) (#ttn-bern), a community which runs meet-ups and hands-on events throughout the year. We connect local makers who have ideas of projects, and offer a forum for anyone building solutions on LoRaWAN and similar protocols. You are very welcome to join [#ttn-bern here](https://www.thethingsnetwork.org/login/?next=/community/Bern/).
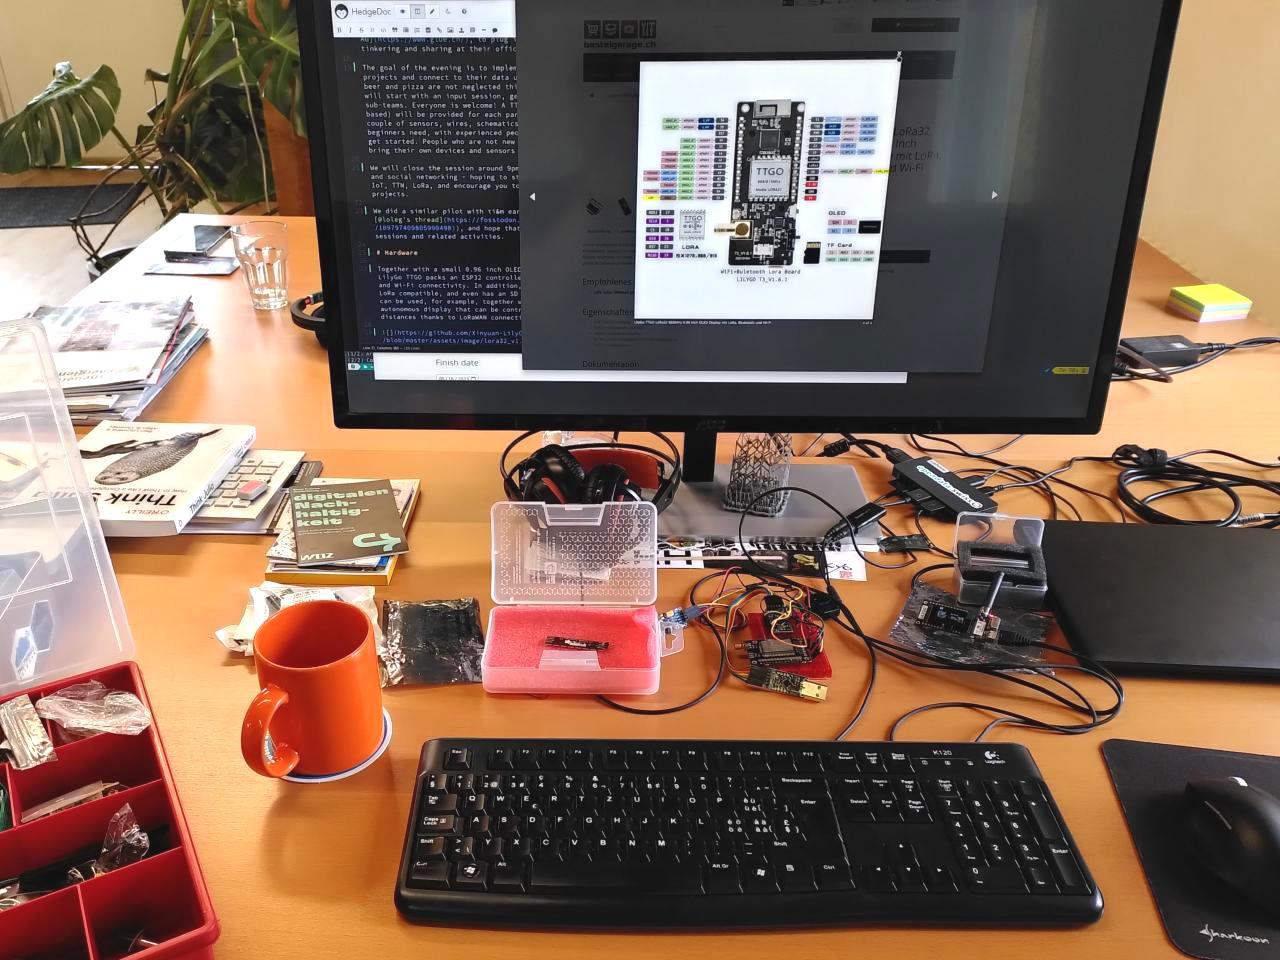
_Oleg's workbench at the SharedSpace in Köniz, testing the LilyGo TTGO. If you have a project idea, have a question, or would like a workshop like this in your office, write me a note at oleg @ datalets.ch - or just stop by for tea if you're in the area!_
:bulb:
# Hardware
The [LilyGo](https://www.lilygo.cc/) TTGO packs an [ESP32](https://en.wikipedia.org/wiki/ESP32) controller with full Bluetooth and Wi-Fi connectivity. In addition, the module has a [SX1276](https://www.semtech.com/products/wireless-rf/lora-connect/sx1276) transceiver for LoRa connectivity at EU (868 MHz) frequencies. The module can be used as an autonomous node that can be controlled over long distances thanks to LoRaWAN connectivity (that stands for [Long Range Wide Area Network](https://en.wikipedia.org/wiki/LoRaWAN)), and features low power consumption.
We will show you how to wire the sensor to your microcontroller - completed, the project will look like this:

To keep costs and learning curves low for our workshop, we went with the barebones format of the LilyGo, which does not have an attached screen. You can still connect an external display if you need to, or buy the [integrated](https://www.bastelgarage.ch/lilygo-ttgo-lora32-868mhz-0-96-inch-oled-display-mit-lora-bluetooth-und-wi-fi) version separately. You can also attach a solar or USB-power pack, or the special [LiPo battery](https://www.bastelgarage.ch/lipo-akku-1000mah-jst-1-25-lithium-ion-polymer-fur-lora-ttgo), for which the wires are already in your kit.
The hardware comes in a plastic box that can be drilled with openings for cables, and has a small antenna attachment. If you would like something more elaborate, designs for 3D printing a case for the LilyGo TTGO can be found on [Thingiverse](https://www.thingiverse.com/thing:5507752). There is a finished case available on [Bastelgarage](https://www.bastelgarage.ch/lilygo-t-display-gehause-abs?search=lilygo%20t-display%20geh%C3%A4use).
More details on the LilyGo device can be found at [Bastelgarage](https://www.bastelgarage.ch/lilygo-ttgo-lora-v1-0-esp32-sx1276-eu868). Stocks are low at the moment, but hopefully soon it will be possible to order more devices for your projects.
Further down, we share some information about the sensors that we plan to connect to the LilyGo board. But first, a word on programming the firmware, using the Software that you will need for our workshop.
# Software
We will bootstrap your device with a project that monitors the temperature and pressure in the room, and sends sensor readings to a gateway of [The Things Network](https://www.thethingsnetwork.org/). From there, you can connect to a cloud storage API to collect the data. More details on how to set up and customize this project, either to build a dashboard, or change the sensor data, will be provided at the workshop.
To work more closely with the LilyGo device, we need to install the [Arduino](https://www.arduino.cc/en/software) software, and set it up for communication with the ESP32 microprocessor. Instructions are available on the [product page](https://www.lilygo.cc/products/t3s3-v1-0) and on [GitHub](https://github.com/Xinyuan-LilyGO/LilyGo-LoRa-Series#lilygo-lora-series). Various applications that support the LilyGo, such as [Paxcounter](https://github.com/cyberman54/ESP32-Paxcounter), or libraries from [Adafruit](https://github.com/adafruit/DHT-sensor-library), could then be downloaded into the device flash memory. We call this firmware, because every time the LilyGo is powered up, it runs the same program that you flashed onto it last time.
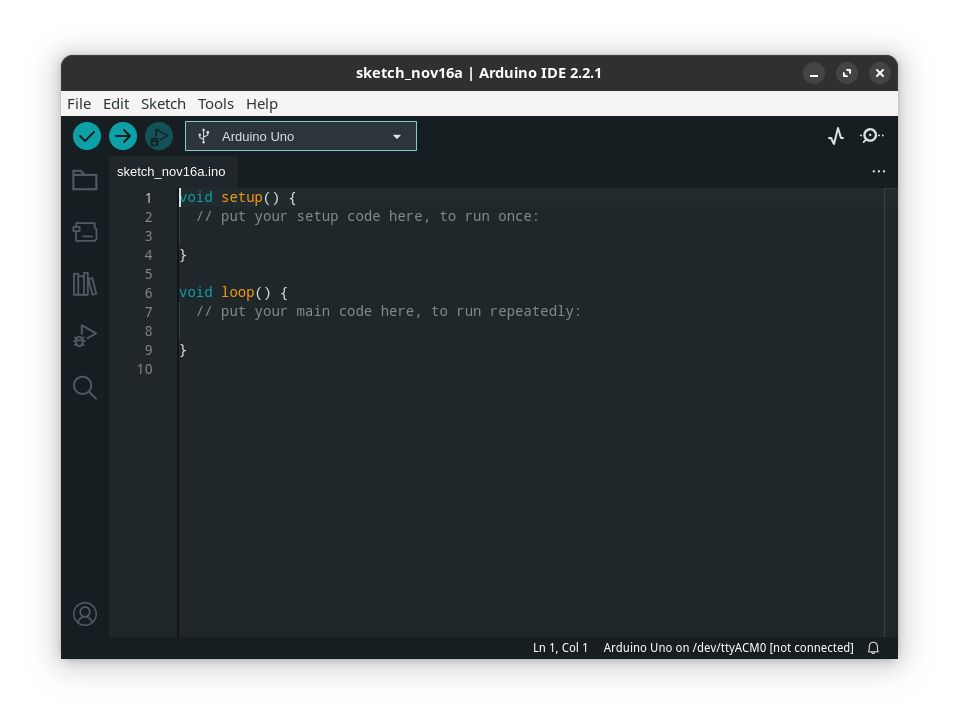
> :bulb: **To save time**, please download and install the [Arduino 2.2.1 IDE](https://www.arduino.cc/en/software) in advance. We can then easily guide you through the rest of the steps on location.
#### Setting up with Arduino IDE
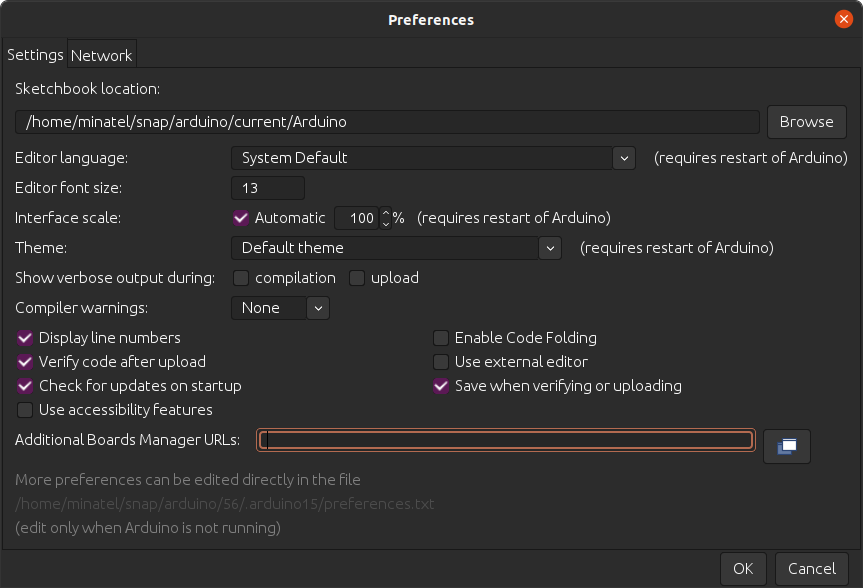
**(Step 1)** Once you have installed the Arduino IDE, we need to install some extensions to make it acknowledge the LilyGo and support all its functions. The first step is to ensure that we have full support for ESP32 by adding the [Stable release](https://espressif.github.io/arduino-esp32/package_esp32_index.json) link to the **Additional board managers URL** in the preferences. There are [more instructions](https://docs.espressif.com/projects/arduino-esp32/en/latest/installing.html#installing-using-arduino-ide) with screenshots from Espruino if you need them.
**(Step 2)** We can add the LilyGo libraries by downloading them from [GitHub](https://github.com/Xinyuan-LilyGO/LilyGo-LoRa-Series). Here is a direct [link to the ZIP file](https://github.com/Xinyuan-LilyGO/LilyGo-LoRa-Series/archive/refs/heads/master.zip) if you need it. We will need to copy the contents of the `lib` folder into our own Arduino library folder:
in Linux, it is ~/Arduino/libraries
in MacOS, it is ~/Documents/Arduino/libraries
in Windows, it is %USERPROFILE%\My Documents\Arduino\libraries
**(Step 3)** Restart the Arduino IDE to make sure the libraries have loaded. Open the `Board Manager` menu ("Tools => Board => Board Manager"), search for `esp32` and select **esp32 by Espressif** to INSTALL the latest version. After you do this, you can select the board you have from the list of boards in the `ESP32 Arduino` menu ("Tools=> Board => ESP32 Arduino"). For our LilyGo board, the one you want is **ESP32 Dev Module**:
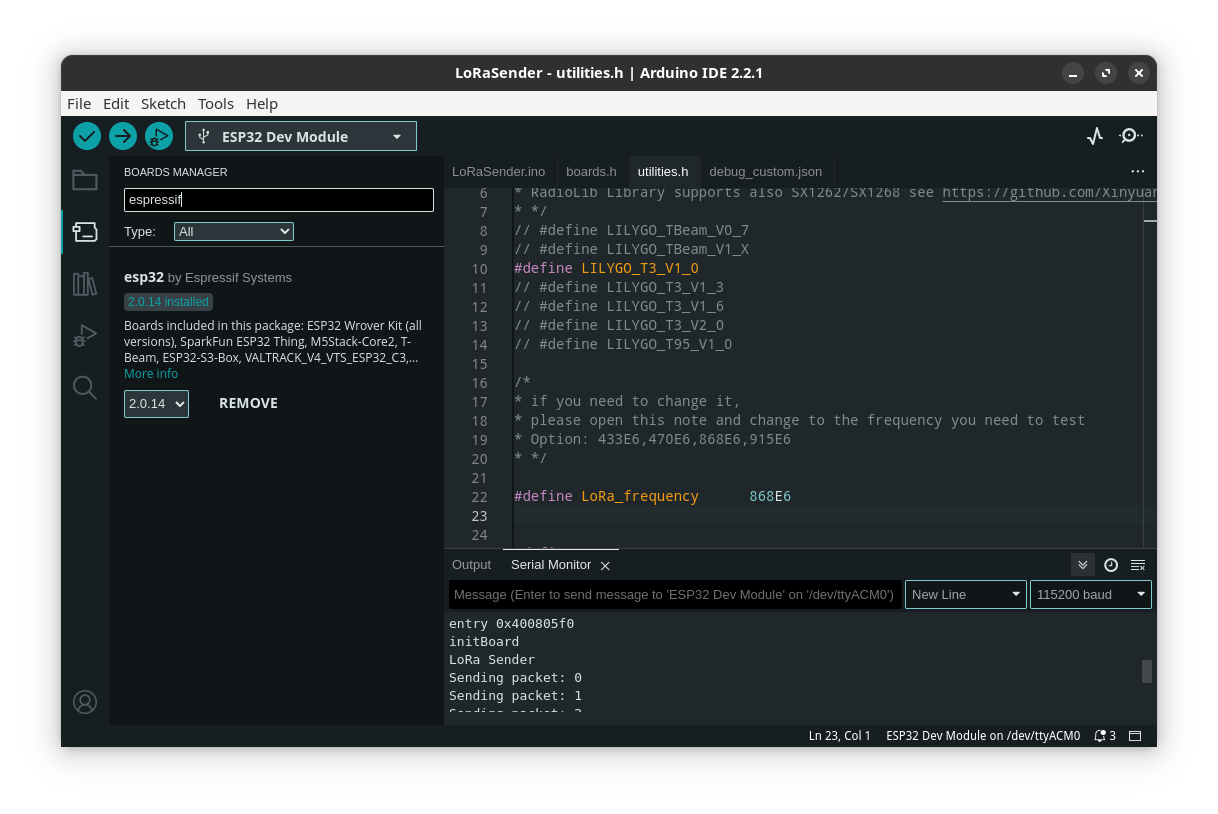
**(Step 4)** Finally, get our [example code from GitHub](https://github.com/loleg/lilygo-lora-dht) ([⬇️ ZIP](https://github.com/loleg/lilygo-lora-dht/archive/refs/heads/main.zip)). Make sure that the correct device is selected in `utilities.h`, by uncommenting (removing `//`, as in the screenshot above) the line that has the name of the device you are using, i.e.:
`#define LILYGO_LORA_V1_0`
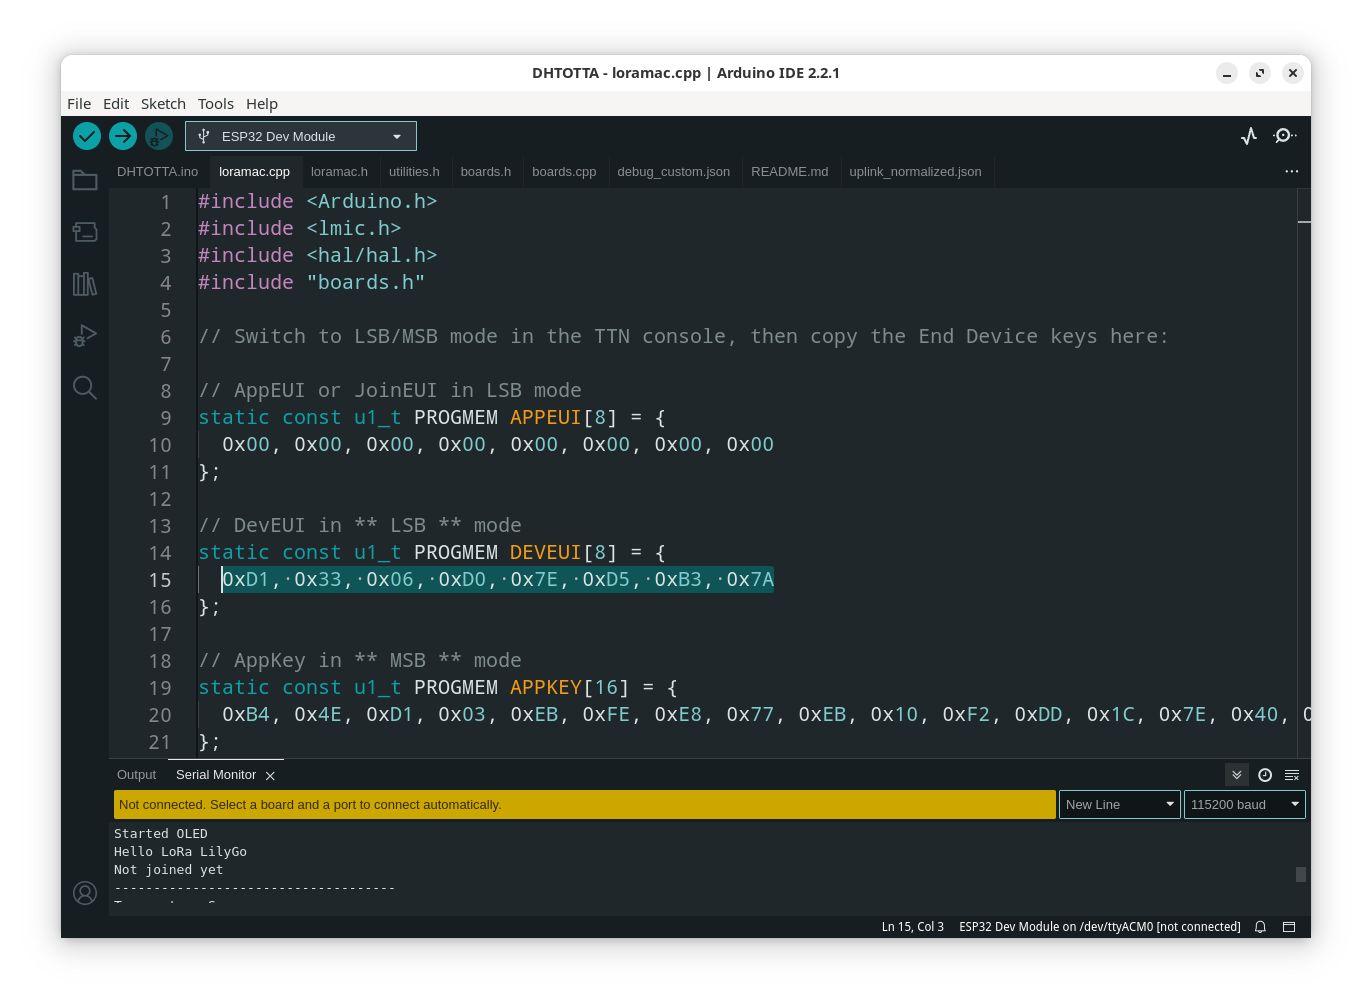
You will also get a DevEUI key in LSB format from us (or we will show you how to get it from the TTN Console), which you should paste into the `loramac.cpp` file:
**(Step 5)** Select the USB port connected to the LilyGo board in the Tools => Port menu, and click **Upload** to compile and run your sketch. The built-in [Serial Monitor](https://docs.arduino.cc/software/ide-v2/tutorials/ide-v2-serial-monitor/) at the bottom of the Arduino screen is probably all you will need to debug the ESP32.
For advanced users, there are other terminal emulation apps like [HTerm](https://www.der-hammer.info/pages/terminal.html) (Lin/Win) or [SerialTools](https://apps.apple.com/us/app/serialtools/id611021963?mt=12) (Mac) that can achieve the same result or have more features. Note that setting up debugging with the Arduino IDE includes a few extra steps. See the [ESP32 guide here](https://docs.arduino.cc/tutorials/nano-esp32/debugging). For now, we can just monitor the serial console as in this screenshot:
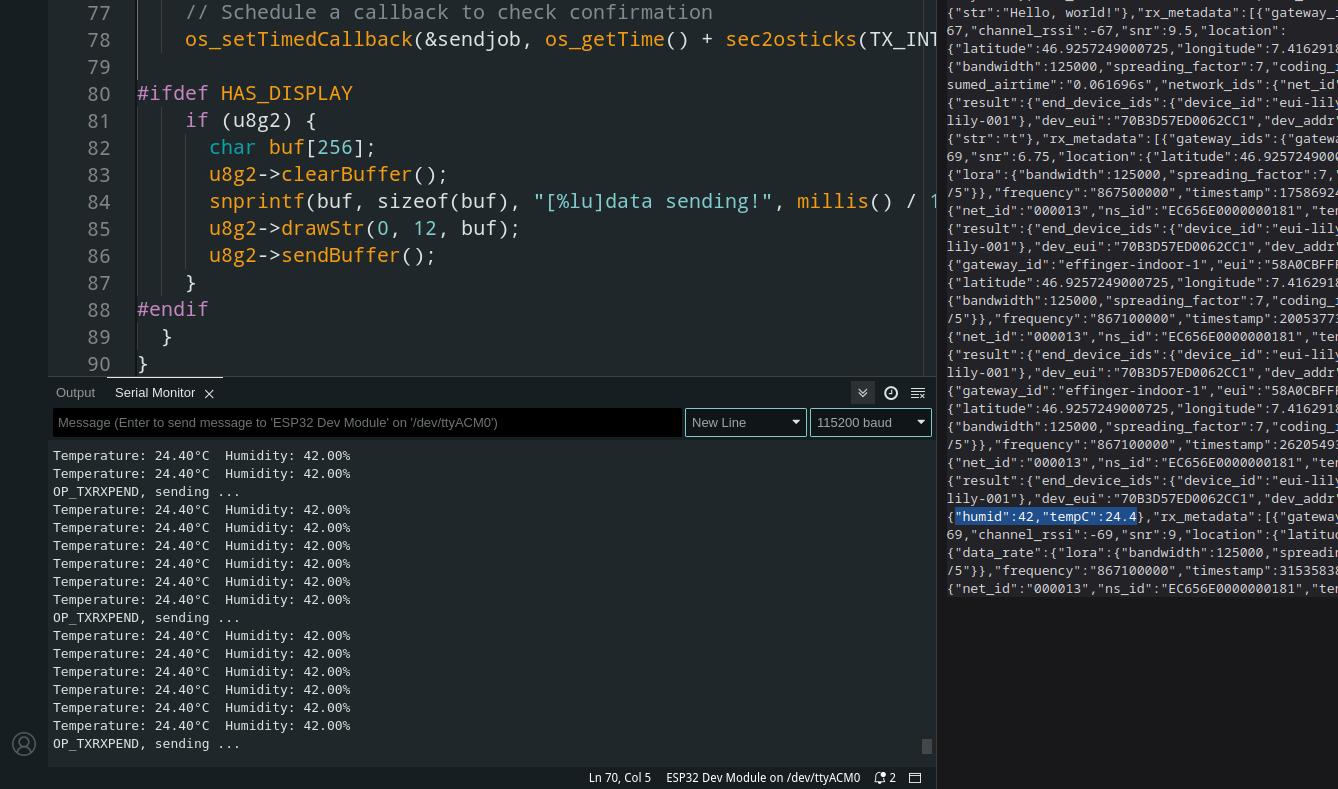
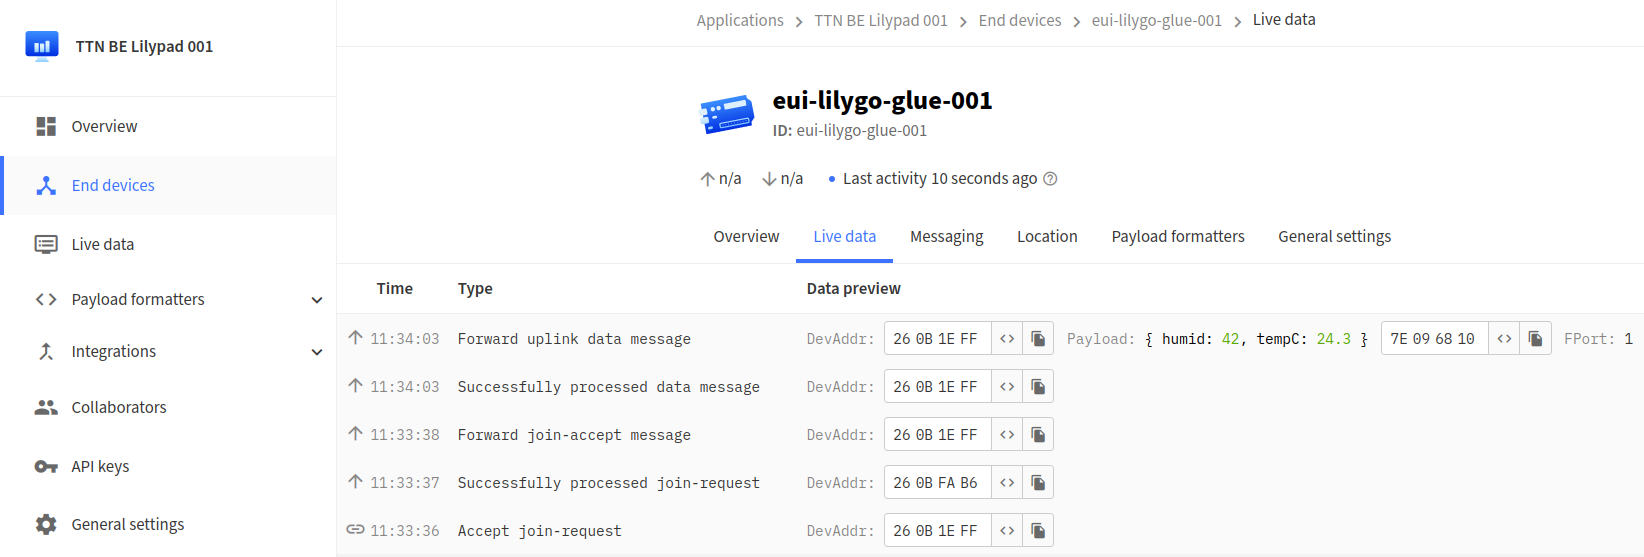
At this point your device should be transmitting the environment data to The Things Network (TTN)! We should see your device transmitting data in the console:
To make use of the data, you can either connect to the MQTT endpoint of TTN, or use the handy Storage Integration APIs, accessible through a URL such as:
https://eu1.cloud.thethings.network/api/v3/as/applications/ttn-be-lily-001/devices/eui-lilygo-glue-000/packages/storage/uplink_normalized
Replace `eui-lilygo-glue-000` with the glue-001, glue-002, .. identifier of your individual device. You will get a series of JSON objects separated by a newline (not parseable as a JSON document as a whole!), which contain something like this:
```json
{
"result":{
"end_device_ids":{
"device_id":"eui-lilygo-glue-000",
"application_ids":{
"application_id":"ttn-be-lily-001"
},
"dev_eui":"70B3D57ED0062CDD",
"dev_addr":"260BC8FA"
},
"received_at":"2023-11-21T10:59:43.244249496Z",
"uplink_message":{
"f_port":1,
"f_cnt":30,
"frm_payload":"agmUEQ==",
"decoded_payload":{
"humid":45,
"tempC":24.1
},
"rx_metadata":[
{
"gateway_ids":{
"gateway_id":"effinger-indoor-1",
"eui":"58A0CBFFFE80134A"
},
"time":"2023-11-21T10:59:42.988676071Z",
"timestamp":712113307,
"rssi":-57,
"channel_rssi":-57,
"snr":10.25,
"location":{
"latitude":46.9257249000725,
"longitude":7.41629183654807,
"altitude":570,
"source":"SOURCE_REGISTRY"
},
"received_at":"2023-11-21T10:59:42.987150001Z"
},
...
"cluster_address":"eu1.cloud.thethings.network"
}
}
}
}
```
Notice the "humid" and "tempC" values coming from the sensor readings. We will help you to make sense of this data, make a graph or dashboard out of it, on location.
We will also show you how to connect a dashboard like ThingSpeak or Grafana to your data with MQTT.
### TTN device configuration
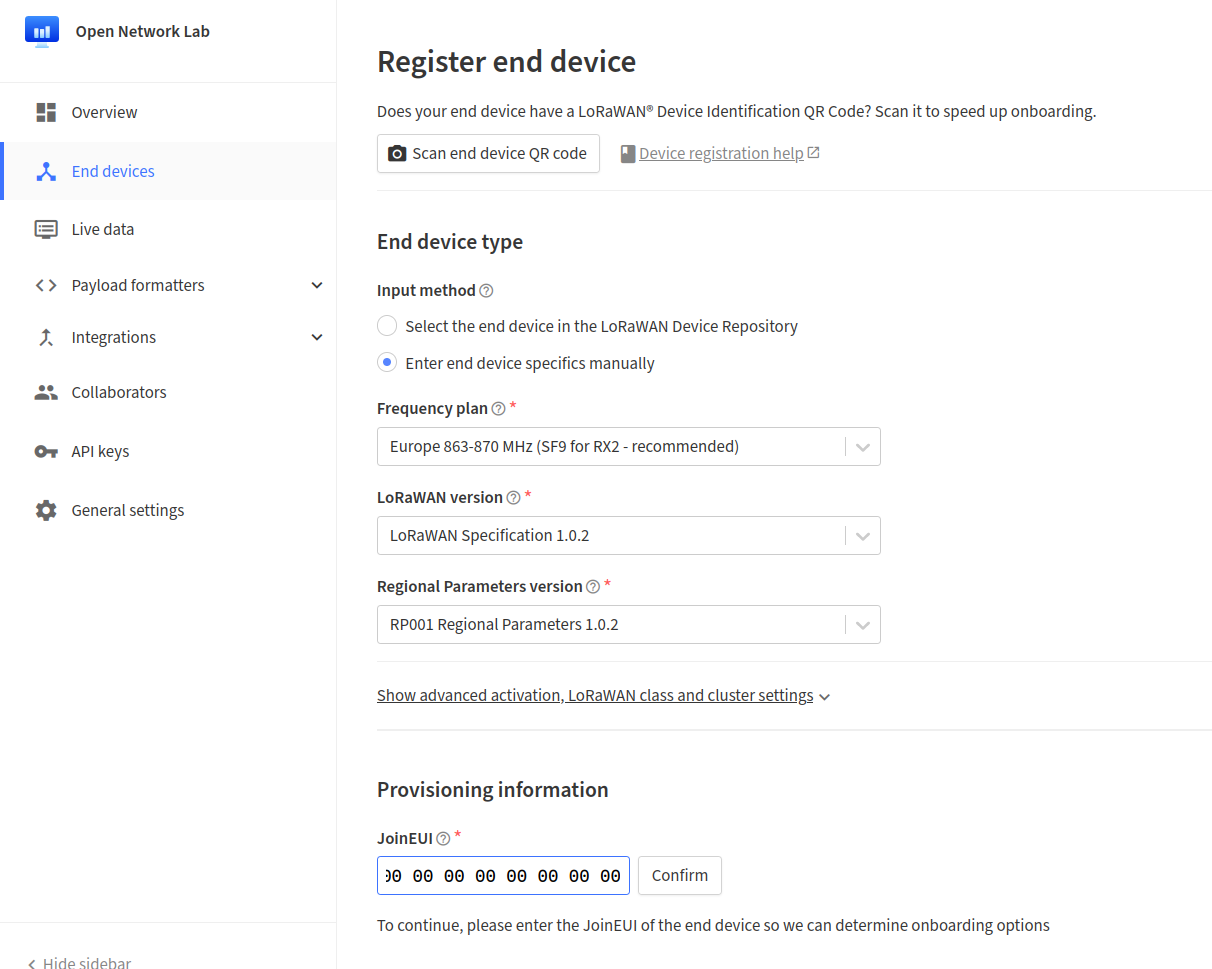
If you want to configure your end device on your own account at https://console.cloud.thethings.network/ - use 000000.. as JoinEUI and connection settings as in the screenshot:
Once you have registered your device, there are three keys you need to copy into your code. The AppEUI and AppKey do not need to be changed if you are using our shared application. Otherwise you will also need to check that those correspond to your device set up:
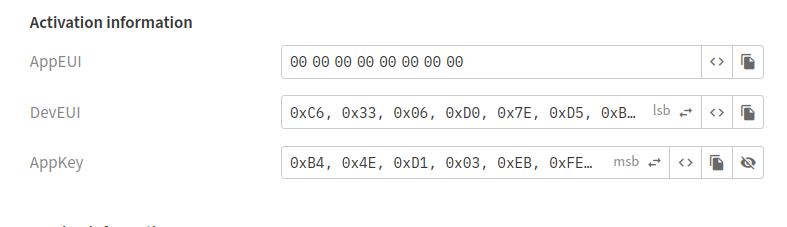
:point_up: Be careful to copy the "lsb" (DevEUI) and "msb" modes (AppKey) into your code. Click on the little icons on the right until the numbers show up like in the screenshot.
#### Summary of software environment
|Level|Tool|Download|Readme|Tutorials|
|---|---|---|---|---|
|Developing|C|[Arduino IDE](https://www.arduino.cc/en/software)|[Getting Started](https://docs.arduino.cc/software/ide-v2/tutorials/getting-started-ide-v2)|[YouTube](https://www.youtube.com/watch?v=KLLUyrzhVAA)|
|Developing**|Python|[GitHub](https://github.com/Xinyuan-LilyGO/lilygo-micropython)|[MicroPython.org](https://micropython.org/download/LILYGO_TTGO_LORA32/)|[Steinlaus](https://steinlaus.de/mit-micropython-auf-dem-ttgo-t-display-zeichnen/)|
|Transmitting|LoRa|[Xinyuan-LilyGO](https://github.com/Xinyuan-LilyGO/LilyGo-LoRa-Series)|[TTGO-LORA32](https://github.com/LilyGO/TTGO-LORA32)|[Randomner](https://randomnerdtutorials.com/ttgo-lora32-sx1276-arduino-ide/)|
|Monitoring|TTN|[The Things Stack V3](https://www.thethingsnetwork.org/)|[Getting Started](https://www.thethingsindustries.com/docs/getting-started/)|[FrOsCon'21](https://media.ccc.de/v/froscon2021-2671-the_things_network_und_der_the_things_stack_v3#t=1158)|
|Visualising|Python|[Jupyter Notebook]()|TBD|TBD|
\*\* _MicroPython is available with limited support on our T3, and CircuitPython is not yet [officially](https://circuitpython.org/downloads?q=lilygo) supported. Will be therefore use the C language in our workshop._
# Sensors
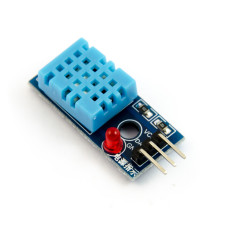
We will provide everyone with a DHT11 sensor, cables and wires to get started with a simple and useful LoRa project.
Your initial goal is to assemble the kit, and read the data. As a next step, you can either make a cool online dashboard, analyse the readings using a data science tool, try a different sensor, or modify in other ways the configuration of the device.
The sensors are connected to the GND and 5V (or 3.3V, depending on the sensor) pins for power, and at least one additional pin for data transmission (e.g. 13, 17, 23).
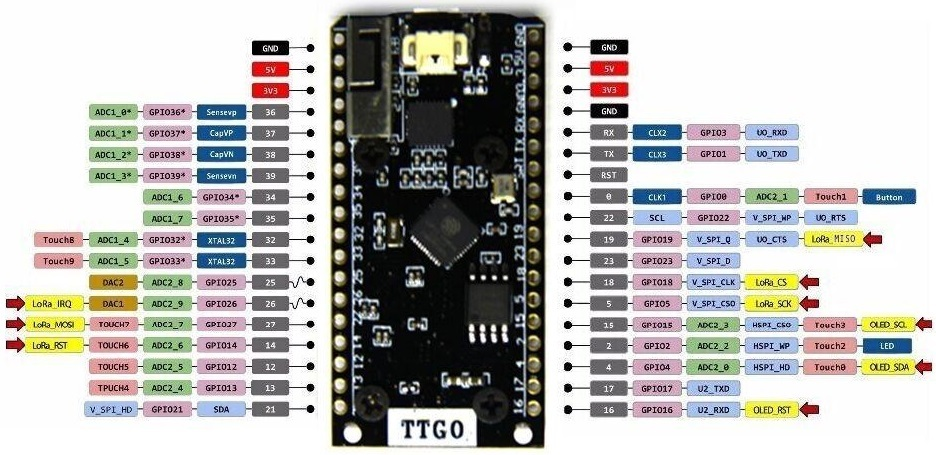
_Pin schematic of the LilyGo TTGO LoRa v.1.0 board_
Once you succeed in publishing your DHT11 data, you can also try some additional sensor modules.
#### 🟢 DHT11 Temperatur und Luftfeuchtigkeitssensor
The DHT11 is a low cost humidity and temperature sensor with a digital interface and a 1-wire connection. The sensor is already factory calibrated, but does not have such a high resolution. If you want higher resolution and better accuracy, we also recommend the DHT22. You can find a ready-made Arduino library for the control in the Library Manager under "DHT Sensor Library". The resistors needed for the control are already built into the board. So you can simply plug the board into your Arduino and get started.
Details: [Arduino Reference](https://reference.arduino.cc/reference/en/libraries/dht11/) / [Bastelgarage
](https://www.bastelgarage.ch/bauteile/sensoren/temperatur/dht11-temperatur-und-luftfeuchtigkeitssensor)
#### 🟠 Wassersensor / Füllstandsmelder
You can use this water sensor to detect water or determine a fill level. For example, you can build a water alarm for in the cellar, near the washing machine, or detect whether a water barrel is full. An amplifier is already soldered onto the sensor. This means you can simply read the sensor via an analogue input on your Arduino or Raspberry Pi. The deeper the contact of the sensor is in the water, the higher the analogue voltage.
Details: [Galaxus](https://www.galaxus.ch/en/s1/product/purecrea-water-sensor-level-indicator-development-boards-kits-38653903) / [Bastelgarage
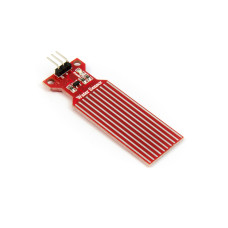](https://www.bastelgarage.ch/wassersensor-fullstandsmelder?search=f%C3%BCllstand)
#### 🔴 Feuchtigkeitssensor / Bodenfeuchtesensor Modul
With this soil moisture sensor, you can easily measure the moisture of plants and detect when the plant needs to be watered. The sensor consists of two parts that need to be connected using the two jumper cables supplied. The measuring probe is inserted into the soil and measures the resistance of the soil, which changes with the moisture. The evaluation module generates an analogue value for the Arduino, as well as a digital signal whose threshold value can be set using the potentiometer on the module. A programming example for reading out an analogue sensor can be found in the Arduino IDE under Examples/Analogue/AnalogueInput.
Details: [Digitec](https://www.digitec.ch/en/s1/product/purecrea-moisture-sensor-soil-moisture-sensor-module-development-boards-kits-38633734) / [Bastelgarage
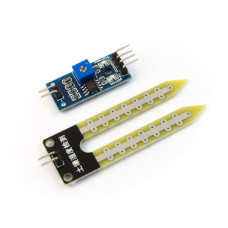](https://www.bastelgarage.ch/feuchtigkeitssensor-bodenfeuchtesensor-modul?search=bodenfeuchtesensor)
> :bulb: If you will bring another sensor, share it on the **[challenge board](https://meta.dribdat.cc/event/14)**
All of our hardware is supplied by [Bastelgarage](https://www.bastelgarage.ch/) in Kyburg-Buchegg. They have an excellent [online forum](https://forum.bastelgarage.ch/) if you have any further questions about their brands.
[](https://www.bastelgarage.ch/)
---
# Further Learning
Here are some books, links and articles to help you dive deeper:
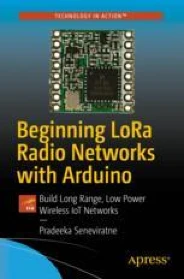 
📘 [Beginning LoRa Radio Networks with Arduino](https://link.springer.com/book/10.1007/978-1-4842-4357-2) - Pradeeka Seneviratne
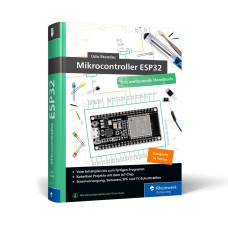
📘 [ESP32 Buch](https://www.bastelgarage.ch/rheinwerk-verlag-gmbh/mikrocontroller-esp32-das-umfassende-handbuch-von-udo-brandes) - Udo Brandes
📘 [Develop and Operate Your LoRaWAN IoT Nodes](https://www.orellfuessli.ch/shop/home/artikeldetails/A1063577815) - Claus Kühnel
📘 [LoRaWAN-Knoten im IoT](https://www.orellfuessli.ch/shop/home/artikeldetails/A1062577443) - Claus Kühnel
🧑🏾🏫 [The Things Certified](https://www.thethingsnetwork.org/achievements/a/the-things-certified-fundamentals/) - Fundamentals course
🧑🏾🏫 [LoRaWAN Fundamentals course](https://www.udemy.com/course/lorawan-fundamentals/) - Udemy
⏯️ The Things Network - [Security webinar](https://www.youtube.com/watch?v=oOUoHEgEDQQ)
:tea: